Creating a Windows 10 IoT driven remote controlled car with the Raspberry PI 2
Jürgen Gutsch - 07 March, 2016
In the last few months a started a small project with the kids. We wanted to create a car, which can be remote controlled via Wifi and a smart phone.
We bought a 2 wheel drive robot car chassis kit to get two motors, a chassis and a battery pack. This kit also includes a small switch and a rotatable stabilizing wheel. To steer the car it is pretty much easier to control two wheels with two separate servos.
I already had a L293D stepper motor driver, some jumper cables and a prototyping board to connect all that stuff. The good thing about the L293D is, that I can control two servos separately.
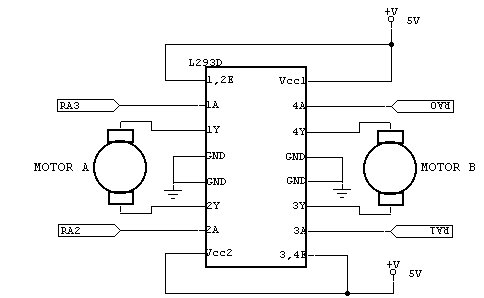
The L293D is pretty cool, because each side can control one servo. The outer pins connects to the power for the servos. In our case the battery pack with 6V. The two inner pins are going to the ground. The pins left and right from the inner pins need to be connected to the servos and the other two pins (RA0 to RA3) are connected to the Raspberry PI. This pins are used to control the servos.
- sending a high to RA0 (on GPIO 23) moves the right wheel forward
- sending a high to RA1 (on GPIO 22) moves the right wheel backward
- sending a high to RA2 (on GPIO 18) moves the left wheel backward
- sending a high to RA3 (on GPIO 17) moves the left wheel forward
Setting all the jumpers, connecting all to the RPI and the battery pack and it looks like this:
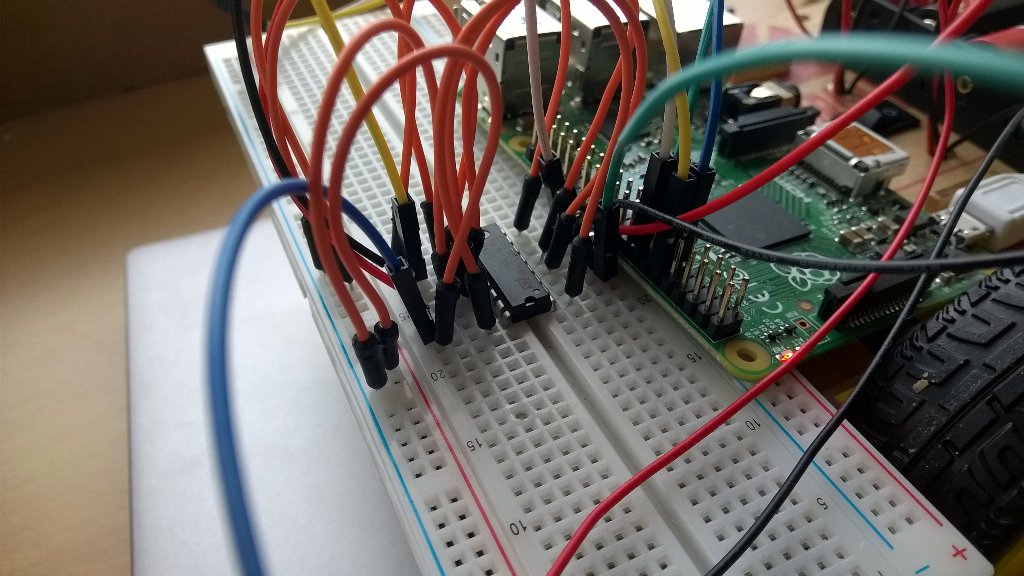
I use a small power pack to get the right power (5V) for the Raspberry PI. I use the battery pack for the servos and the power pack for the RPI.
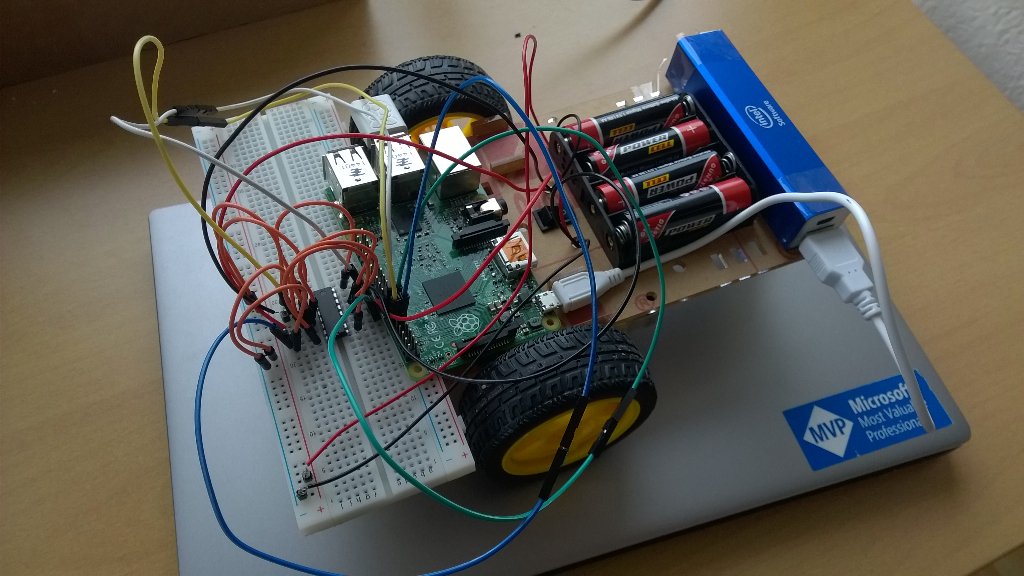
Let me introduce Rollie :)
To control the servos and to provide the remote control, we decided to use Windows 10 IoT, because it was simpler to setup the Wifi connection in the RPI. To setup Windows 10 IoT on a SDCard please follow the getting started guide on https://ms-iot.github.io/content/en-US/GetStarted.htm
To setup Windows 10 IoT on the PI, we needed to connect the PI on a screen and to connect a keyboard and a mouse. I followed the setup steps on the screen and configured the Wifi connection. (BTW: I use the original Raspberry Pi Wifi Adapter) If this is done the RPI will automatically connect to the configured WiFi and we don't need the screen, the keyboard and the mouse anymore.
Controlling the car
My idea was to provide a simple web page with the UI on it. This website should send commands to the PI via a simple Web API. Also the web page should be hosted on the RPI

Pressing a button should start the servo and releasing the button should stop the servo. The red "Stop"-button is something like a emergency stop while developing and will be removed later on.
Providing a Web API and the static web page was a bit challenging with the first tries, but I found a small library which helps a lot. It was Restup by Tom Kuijsten. Unfortunately this library didn't work with the Windows IoT Core Background Application, but a Universal Blank App works pretty fine. Restup is available as a NuGet package. I use version 1.0.0-beta2:
PW> Install-Package Restup -Pre
I created a new blank app and named it RollieServer. I added some code to initialize and start the HTTP server in the Page_Loaded method of the MainPage:
private async void Page_Loaded(object sender, RoutedEventArgs e)
{
    await InitializeWebServer();
}

private HttpServer _httpServer;
private async Task InitializeWebServer()
{
    // creating the http server
    var httpServer = new HttpServer(5000);
    _httpServer = httpServer;

    // register the api controller
    var restRouteHandler = new RestRouteHandler();
    restRouteHandler.RegisterController<RollieController>();

    // provide the web api
    httpServer.RegisterRoute("api", restRouteHandler);
    // provide the web ui
    httpServer.RegisterRoute(new StaticFileRouteHandler(@"Web"));

    // starting the http server
    await httpServer.StartServerAsync();
}
I don't care about the XAML code of the page, because I don't need any UWP UI directly on the PI.
The StaticFileRouteHandler is pretty cool: I just needed to create a folder called "web" in the project folder. After that I was able to place a index.html page with the web UI in that folder. I also added a small CSS file and jQuery to that folder.
The RestRouteHandler registeres the RollieController to the HttpServer. Additionally the controller will be registered to the route /api/. Inside the Controller we use AttributeRouting to map the Actions to the specific routes:
[UriFormat("/rollie/{wheel}/{direction}/{rnd}")]
public GetResponse Wheel(string wheel, string direction, string rnd)
{
    // ...
}
In this case we have the sub route /rollie/. wheel specifies the right or the left wheel. direction can be forward, backward or off and the last option rnd is only used to call the API with a unique number to disable the cache. The url could look like this:
/api/rollie/left/forward/130981203
The logic
The RollieController provides the web API to control the servos. The controller initializes the RollieMachine which uses two Engines. One Engine per servo to control:
[RestController(InstanceCreationType.Singleton)]
public class RollieController
{
    private readonly RollieMachine _rollie;
    public RollieController()
    {
        _rollie = new RollieMachine(
            leftEngine: new Engine(forwardPin: 23, backwardPin: 22),
            rightEngine: new Engine(forwardPin: 17, backwardPin: 18));
    }
I pass in the GPIO pin numbers to use, into the engines.
In the API action I decided not to call specific methods of the RollieMachine to move the wheels direcly, but to set states of the Machine to move it afterwards depending on the states:
[UriFormat("/rollie/{wheel}/{direction}/{rnd}")]
Response Wheel(string wheel, string direction, string rnd)
{
    var stateChanged = false;

    if (wheel.Equals("left"))
    {
        _rollie.LeftState = EngineState.Off;

        if (direction.Equals("forward"))
        {
            _rollie.LeftState = EngineState.ForwardOn;
            stateChanged = true;
        }
        else if (direction.Equals("backward"))
        {
            _rollie.LeftState = EngineState.BackwardOn;
            stateChanged = true;
        }
        else if (direction.Equals("off"))
        {
            _rollie.LeftState = EngineState.Off;
            stateChanged = true;
        }
    }

    if (wheel.Equals("right"))
    {
        _rollie.RightState = EngineState.Off;
        if (direction.Equals("forward"))
        {
            _rollie.RightState = EngineState.ForwardOn;
            stateChanged = true;
        }
        else if (direction.Equals("backward"))
        {
            _rollie.RightState = EngineState.BackwardOn;
            stateChanged = true;
        }
        else if (direction.Equals("off"))
        {
            _rollie.RightState = EngineState.Off;
            stateChanged = true;
        }
    }

    if (stateChanged)
    {
        _rollie.Move();
    }

    return new GetResponse(
        GetResponse.ResponseStatus.OK,
        new DataReceived { Wheel = wheel, Direction = direction });
}
The call of the method Move() triggers the RollieMachine to do its job:
public void Move()
{
    MoveLeft();

    MoveRight();
}

private void MoveLeft()
{
    if (LeftState == EngineState.Off)
    {
        _leftEngine.Off();
    }
    else if (LeftState == EngineState.ForwardOn)
    {
        _leftEngine.Forward();
    }
    else if (LeftState == EngineState.BackwardOn)
    {
        _leftEngine.Backward();
    }
}

private void MoveRight()
{
    if (RightState == EngineState.Off)
    {
        _rightEngine.Off();
    }
    else if (RightState == EngineState.ForwardOn)
    {
        _rightEngine.Forward();
    }
    else if (RightState == EngineState.BackwardOn)
    {
        _rightEngine.Backward();
    }
}
The RollieMachine is only a sort of a controller class, which is handling states and triggers the engines to move in the tight direction. Lets have a look into the Engine class. To talk to the GPIOs of the Raspberry PI you need to add a reffernce to Windows IoT Extensions for the UWP to your project. This library should already be available on your machine and helps you to use the GPIO pins of your Raspberry PI, Arduino, or whatever is supported by Windows 10 IoT.
The Engine first needs to initialize the GPIOs (aka Pins). We need two pins, one to move the servo in the forward direction and one to backward:
internal class Engine : IDisposable
{
    private readonly int _forwardPin;
    private readonly int _backwardPin;

    private GpioPin _forwardGpio;
    private GpioPin _backwardGpio;

    public Engine(int forwardPin, int backwardPin)
    {
        _forwardPin = forwardPin;
        _backwardPin = backwardPin;

        InitGpio();
    }

    private async void InitGpio()
    {
        var gpio = await GpioController.GetDefaultAsync();

        if (gpio == null)
        {
            _forwardGpio = null;
            _backwardGpio = null;
            return;
        }

        _forwardGpio = gpio.OpenPin(_forwardPin);
        _backwardGpio = gpio.OpenPin(_backwardPin);

        _forwardGpio.Write(GpioPinValue.Low);
        _forwardGpio.SetDriveMode(GpioPinDriveMode.Output);

        _backwardGpio.Write(GpioPinValue.Low);
        _backwardGpio.SetDriveMode(GpioPinDriveMode.Output);
    }
In the method InitGpio() we need to get the GpioController to access the Pins. After some simple null handling I open the Pins with the passed in pin number. I also need to configure the pins as output pins and I write a Low to the output to ensure not to send anything.
With the next four methods I really control the servos:
// ensure to stop the servos and dispose the pins:
public void Dispose()
{
    Off();
    _forwardGpio?.Dispose();
    _backwardGpio?.Dispose();
}

// stop all servos:
public void Off()
{
    _forwardGpio?.Write(GpioPinValue.Low);
    _backwardGpio?.Write(GpioPinValue.Low);
}

// stop all servos and start moving forward
public void Forward()
{
    Off();
    _forwardGpio?.Write(GpioPinValue.High);
}

// stop all servos and start moving backward
public void Backward()
{
    Off();
    _backwardGpio?.Write(GpioPinValue.High);
}
It is pretty much important not to send Highs to both pins in the same time. This could kill the servo, the L293D or at least the RPI. This is why I always sent Low to all the pins, before sending a High to one of them.
The web UI
Shame on me, but the first draft of the web UI is using a layout table to place the buttons and I also use jQuery to control the buttons and to call the API. I will improve this in the future, but this is a small project with the kids and I can't write too much boring code with the Kids, who want to see a driving robot as a cool results. (The Kids are like customers, who want to see results instead of nice looking code)
<table>
<tr>
<td class="left"><button id="vl" type="button">Vor</button></td>
<td class="center"> </td>
<td class="right"><button id="vr" type="button">Vor</button></td>
</tr>
<tr>
<td class="left"><button id="bl" type="button">Zurück</button></td>
<td class="center"><button id="stop" type="button">Stop</button></td>
<td class="right"><button id="br" type="button">Zurück</button></td>
</tr>
</table>
All the buttons are controlled with jQuery, which is also used to call the API:
$(function () {

	var leftForward = $('#fl');
    var rightForward = $('#fr');
    var leftBackward = $('#bl');
    var rightBackward = $('#br');

    var stop = $('#stop');

    var send = function (wheel, direction) {
        var now = Date.now();

        var url = '/api/rollie/' + wheel + '/' + direction;
        url += '/' + now;

        console.log('do: ' + url);
        $.get(url, function () {
            console.log('done: ' + url);
        });
    };

    leftForward.bind('mousedown', function () {
        send('left', 'forward');
    });
    leftForward.bind('mouseup', function () {
        send('left', 'off');
    });

    rightForward.bind('mousedown', function () {
        send('right', 'forward');
    });
    rightForward.bind('mouseup', function () {
        send('right', 'off');
    });

    leftBackward.bind('mousedown', function () {
        send('left', 'backward');
    });
    leftBackward.bind('mouseup', function () {
        send('left', 'off');
    });

    rightBackward.bind('mousedown', function () {
        send('right', 'backward');
    });
    rightBackward.bind('mouseup', function () {
        send('right', 'off');
    });

    stop.bind('mouseup', function () {
        send('right', 'off');
        send('left', 'off');
    });
});
With this code, everytime I press a button, the specific wheel will roll. And if I release the button, the wheel stops rolling.
If the app is deployed and running on the RPI I can use the browser on my smartphone to call the web page:
http://192.168.2.58:5000/index.html
To get the right IP address of yuor RPI, you should use the Windows IoT Core Watcher. This guy shows the Windows 10 IoT devices in your network and it displays the addresses, the online states and so on:
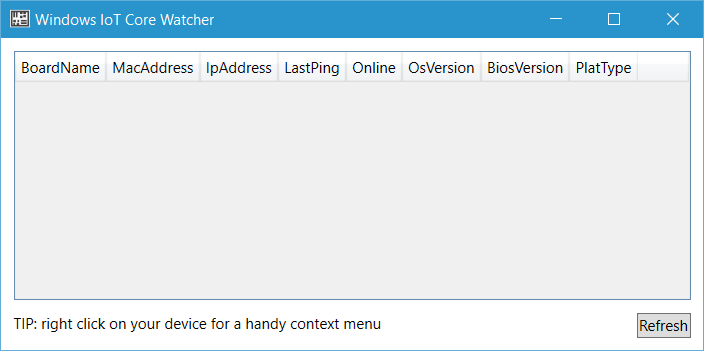
You also need to now the IP to deploy the app to your RPI with Visual Studio 2015.
Deployment
I used Visual Studio 2015 to deploy to the Raspberry PI. This is pretty easy if you know the way to do it ;-)
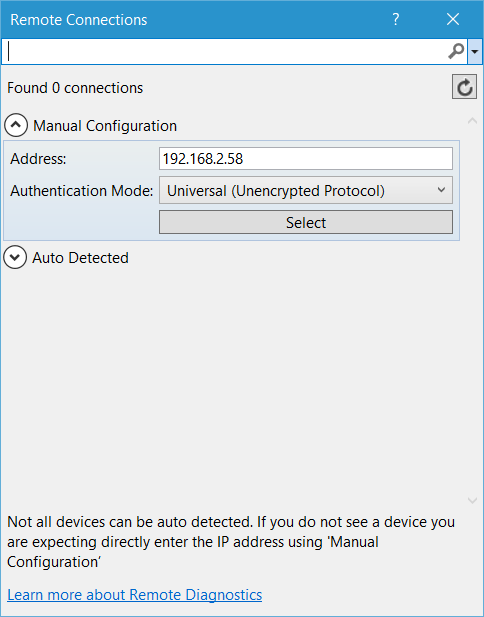
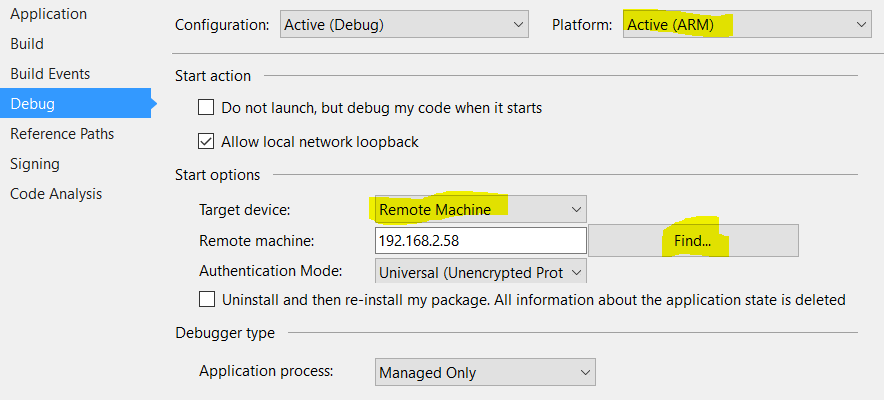
Choose "ARM" as solution platform and Remote Machine as the target. The first time you choose the Remote Machine, the Remote Connections dialog will open. Type in the IP address of your PI and choose the authentication mode Universal. Click select and you are now able to deploy via F5 or via right click and deploy in the context menu of the current project.
To change the Remote Machine settings, just go to the debug settings and reconfigure the settings. I had to change the configuration because I chose the wrong authentication at the first time I tried to deploy:
Conclusion
This is just the first step to build a small robot. Now it is a remote controlled car. The next step is to add a camera and to stream the video to the web UI on the smart phone. We additionally want to add some more sensors and to get this thingy more and more self controlled. :-)
Initially I wanted to use Node.js on a Rasbian OS, to learn more about Node.js. But it took too much time to configure the system to automatically connect to the WiFi and it got more and more boring for the Kids.
Switching to Windows 10 IoT was pretty fast and C# and Visual Studio are well known tools. Only the deployment and development flow is pretty much faster and easier using Node.js, because I can work directly on the RPI using Vi or Nano via a SSH terminal. Anyway, now I will continue working with Windows 10 IoT and Visual Studio 2015.