ASP.NET Core and Angular2 - Part 3
Jürgen Gutsch - 14 April, 2016
Important Note: This blog series is pretty much out of date. It uses an older beta version of Angular2 and the RC2 release of ASP.NET Core. Please have a look int the new posts about Angular2 and ASP.NET Core using the latest versions:
In the second part of this ASP.NET Core and Angular2 series, I wrote about the back-end to provide the data to the Angular2 Application. In this third part, I'm going to show you how the app is structured and how I used routing to navigate between the different components.
The components
Components in Angular2 in general are ordered hierarchically. You have a root component which is bootstrapped in the HTML page and which hosts the app. As you can see in part one of this series, the index.html calls the app bootstrap and the bootstrap method gets the AppComponent passed in.
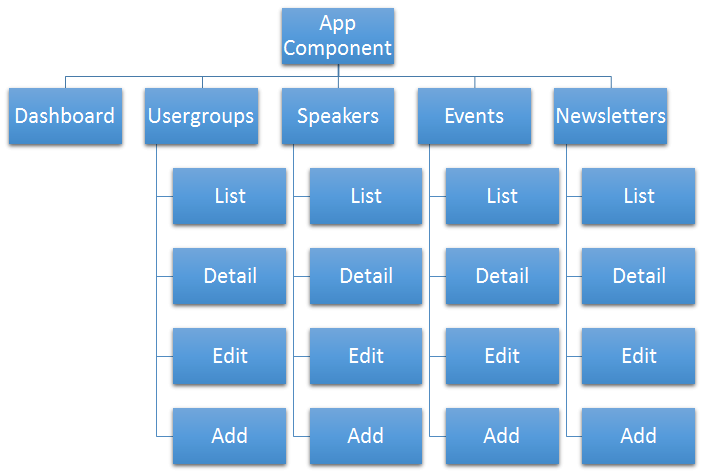
I created five sub-components for the INETA Database:
- Dashboard to quick access some most used features
- The speakers area
- The user groups area
- The events area
- And the newsletter management
Except the dashboard, all of this sub-components also have sub-components for the CRUD operations:
- List
- Detail
- Add
- Edit
(It's not CRUD, but CRU: create, read, update. Delete an item doesn't need a separate view or a separate component.)
With this structure we get a hierarchy of three levels:
Templates used
Level 1 and level 2 doesn't contain any logic. The classes are completely empty. Only the AppComponent, the Dashboard and all of the third level components need a detailed view. The AppComponent view provides the main navigation and a <router-outlet> directive to place the result of the routing. The Dashboard contains a link list to the most used feature. And all of the third level components use a detailed template.
@Component({
    selector: 'speakers-list',
    templateUrl: 'app/speaker/speakers-list.template.html',
    directives: [
        ROUTER_DIRECTIVES
    ],
    providers: [SpeakerService, HTTP_PROVIDERS]
})
export class SpeakersListComponent implements OnInit {
	// add logic here
}
The other second level components have an inline template, which is just the <router-outlet> directive to place the results of their routes:
@Component({
    selector: 'speakers',
    template: `
    <router-outlet></router-outlet>
    `,
    directives: [
        ROUTER_DIRECTIVES
    ]
})
export class SpeakersComponent { } // doesn't need any logic here
All the detail templates are in separate HTML files, which are directly stored in the /wwwroot/app/ folder in a similar sub folder structure than the components.
routing
Since I'm planning a single page application (SPA) it is pretty clear that I should use routing to navigate between the different areas.
The routes between the second level components are defined in the AppComponent:
// ...

import {Dashboard} from './Dashboard/dashboard.component';
import {SpeakersComponent} from './Speaker/speakers.component';
import {UsergroupsComponent} from './Usergroup/usergroups.component';
import {EventsComponent} from './Event/events.component';
import {NewsletterComponent} from './Newsletter/newsletters.component';

@Component({
    // ...
})
@RouteConfig([
    { path: '/Dashboard', name: 'Dashboard', component: Dashboard, useAsDefault: true },
    { path: '/Speakers/...', name: 'Speakers', component: SpeakersComponent },
    { path: '/Usergroups/...', name: 'Usergroups', component: UsergroupsComponent },
    { path: '/Events/...', name: 'Events', component: EventsComponent },
    { path: '/Newsletter/...', name: 'Newsletter', component: NewsletterComponent },
])
export class AppComponent {}
The route to the dashboard is configured as the default route. With this configuration the URL in the browsers address bar changes immediately to /dashboard when I call this app. The other routes contain three dots (/...) in the path. This is needed, because I want to configure child-routing in the second level components, otherwise child-routing is not possible. All the routes are named and bound to a component. In the templates, the links to the different app areas are created by using the routes with their names:
<ul class="nav navbar-nav">
    <li><a href="" [routerLink]="['Speakers']">Speakers</a></li>
    <li><a href="" [routerLink]="['Usergroups']">Usergroups</a></li>
    <li><a href="" [routerLink]="['Events']">Events</a></li>
    <li><a href="" [routerLink]="['Newsletter']">Newsletter</a></li>
</ul>
Inside the second level child-components, I need to access the third level components. This is why I need to configure child-routing inside this components. This child-routing looks a little bit different, because I need to pass entity identifiers to the detail view, or to the edit view component:
// ..

import {SpeakersListComponent} from './speakers-list.component';
import {SpeakersDetailComponent} from './speakers-detail.component';
import {SpeakersEditComponent} from './speakers-edit.component';
import {SpeakersAddComponent} from './speakers-add.component';

@Component({
    // ...
})
@RouteConfig([
    { path: '/', name: 'SpeakersList', component: SpeakersListComponent, useAsDefault: true },
    { path: '/:id', name: 'Speaker', component: SpeakersDetailComponent },
    { path: '/Add', name: 'NewSpeaker', component: SpeakersAddComponent },
    { path: '/Edit/:id', name: 'EditSpeaker', component: SpeakersEditComponent }
])
export class SpeakersComponent { }
The :id tells the route engine, that this is a named placeholder, where we can pass any value (This looks familiar, if you know the ASP.NET MVC routing). The routes are named and bound to the third level components. In this case, the routes to the list components are configured as default routes.
Using the routes in the templates of the specific component, where the route is configured is as easy as shown in the code samples above. But how does it look like, if I need to use a route outside the current context? From the dashboard, I directly want to link to the components to add new entities.
If you carefully read the documentation, you'll see that you can use the herarchy of the reoutes to use it:
<div class="list-group">
    <a href="" [routerLink]="['Speakers', 'NewSpeaker']" class="list-group-item">Neuen Speaker anlegen</a>
    <a href="" [routerLink]="['Usergroups', 'NewUsergroup']" class="list-group-item">Neue Usergroup anlegen</a>
    <a href="" [routerLink]="['Events', 'NewEvent']" class="list-group-item">Neues Event anlegen</a>
    <a href="" [routerLink]="['Newsletter', 'NewNewsletter']" class="list-group-item">Neuen Newsletter anlegen</a>
</div>
The syntax is like this:
['base-route-name', 'child-route-name', 'grant-child-route-name', 'and-so-on-route-name']
The templates
Each of the third level components (even the Dashboard and the root component) are using detailed templates stored in HTML files in the /wwwroot/app/ folder in the same structure as the TypeScript files in the scripts folder. After compiling the TypeScript code, the transpiled JavasSripts are directly beneath the templates:
![]()
I don't want to go deep into the templates and binding stuff, but only show you two of the templates. For more details about the bindings, just visit the Angular2 documentation on http://angular.io/
This is the template of the speakers list:
<h1>All speakers</h1>
<div class="row">
<div class="col-md-12">
<ul class="list-group">
<li class="list-group-item">
<span> </span>
<a href="" [routerLink]="['NewSpeaker']"
class="btn btn-primary btn-xs pull-right">
Add new speaker
</a>
</li>
<li *ngFor="#speaker of speakers" class="list-group-item">
<a href="" [routerLink]="['Speaker', {id: speaker.Id}]">
</a>
<a href="" class="btn btn-danger btn-xs pull-right">
Delete
</a>
<a href="" [routerLink]="['EditSpeaker', {id: speaker.Id}]"
class="btn btn-primary btn-xs pull-right">
Edit
</a>
</li>
<li class="list-group-item">
<span> </span>
<a href="" [routerLink]="['NewSpeaker']"
class="btn btn-primary btn-xs pull-right">
Add new speaker
</a>
</li>
</ul>
</div>
</div>
This templates shows mustache syntax to write out the values of the FirstName and the LastName. This is called "interpolation" and it is a one way binding in the direction from the component to the template.
This templates also uses the routing to create link to the edit view or to the add view. You'll also find the *ngFor, which is the same as the old ng-for. It defines a template to repeat for each item of the speakers. That item will be directly assigned to the variable #speaker
The concepts here are pretty similar to old Angular.JS. Because of the new binding concept, the forms are a bit different:
<h1>Edit speaker</h1>

<form class="form-horizontal">
    <div class="form-group">
        <label for="FirstName" class="col-sm-2 control-label">Firstname</label>
        <div class="col-sm-10">
            <input id="FirstName" class="form-control"
                [(ngModel)]="speaker.FirstName" />
        </div>
    </div>
    <div class="form-group">
        <label for="LastName" class="col-sm-2 control-label">LastName</label>
        <div class="col-sm-10">
            <input id="LastName" class="form-control"
                [(ngModel)]="speaker.LastName" />
        </div>
    </div>

    <!-- some more fields here-->

    <div class="form-group">
        <div class="col-sm-offset-2 col-sm-10">
            <a class="btn btn-default" href=""
                [routerLink]="['Speaker', {id: speaker.Id}]">Cancel</a>
            <button type="submit" class="btn btn-primary"
                (click)="saveSpeaker(speaker)">Save</button>
        </div>
    </div>
</form>
In this template we use different types of binding. The "banana in the box" syntax ([()] called like this by John Papa) defines a two-way binding, which should to be used in forms, to send the users input to the component. For the events we have a one-way binding from the template to the component. This direction is only used for events like this. This is used on the save button.
Conclusion
I'm not completely done with the implementation currently. But I was pretty surprised about how fast I got a running app. Development is pretty fast with Angular2 and you get the first results faster than using the old Angular.JS. Even TypeScript is cool and feels familiar to a C# developer. I'm looking foreward to do a real project with Angular2, TypeScript and ASP.NET Core.
To learn more about the data binding, read excellent the tutorials on http://angular.io/. Another great resource to learn more about Angular2, are the video courses by John Papa on PluralSight.
If you want to go to the details of the INETA Database, please have a look into the GitHub Repository.